10.2. Dynamic Module 使用指南
10.2.1. 配置
我们简称 Luban-Lite 原生开发的映像为 kernel ,使用 Dynamic Module 机制开发的应用为 dm-app。目前仅在 Luban-Lite 内核为 rt-thread 时支持该特性。
10.2.1.1. kernel
10.2.1.1.1. 配置
要使用 Dynamic Module 功能,内核需要打开以下两项配置:
Rt-Thread options  --->
    RT-Thread Components  --->
        C/C++ and POSIX layer  --->
            POSIX (Portable Operating System Interface) layer  --->
                [*] Enable POSIX file system and I/O
                [*] Enable dynamic module APIs, dlopen()/dlsym()/dlclose() etc
还可以选择 dm-app 动态加载时使用的内存 heap。具体的可选 heap 会随不同平台的配置有所不同:
Rt-Thread options  --->
    RT-Thread Components  --->
        C/C++ and POSIX layer  --->
            POSIX (Portable Operating System Interface) layer  --->
                [*] Enable dynamic module APIs, dlopen()/dlsym()/dlclose() etc
                    Select dynamic module use mem (Prsam CMA heap)  --->
                        (X) Sys Heap
                        ( ) Prsam CMA heap
10.2.1.1.2. 符号导出
kernel 中被 dm-app 访问到的符号需要使用 RTM_EXPORT() 宏来进行声明,类似 linux 中的 EXPORT_SYMBOL() 宏。
对于一些标准的 c 库函数,kernel 已经定义好了 RTM_EXPORT() 声明,dm-app 可以直接使用。例如:
RTM_EXPORT(strcpy);
RTM_EXPORT(strncpy);
RTM_EXPORT(strlen);
RTM_EXPORT(strcat);
RTM_EXPORT(strstr);
RTM_EXPORT(strchr);
RTM_EXPORT(strcmp);
RTM_EXPORT(strtol);
RTM_EXPORT(strtoul);
RTM_EXPORT(strncmp);
...
对于 rt-thread api 函数,kernel 已经定义好了 RTM_EXPORT() 声明,dm-app 可以直接使用。例如:
RTM_EXPORT(rt_thread_create);
RTM_EXPORT(rt_thread_yield);
RTM_EXPORT(rt_thread_startup);
RTM_EXPORT(rt_thread_detach);
...
可以在 Luban-lite 的命令行下,使用 list_symbols 命令查看当前系统已经使用 RTM_EXPORT() 声明的符号:
aic /> list_symbols
rt_critical_level => 0x40013cc0
rt_exit_critical => 0x40014090
rt_enter_critical => 0x40013ce0
rt_device_set_tx_complete => 0x40014220
rt_device_set_rx_indicate => 0x40014200
rt_device_control => 0x400141f0
rt_device_write => 0x40014370
rt_device_read => 0x40014330
rt_device_close => 0x400143b0
重要
没有使用 RTM_EXPORT() 声明的 kernel 函数是不能在 dm-app 中使用的。如果用户有自定义的 kernel 函数需要在dm-app 中使用,必须使用 RTM_EXPORT() 声明。
10.2.1.2. DM-APP
10.2.1.2.1. 生成 sdk
dm-app 的开发目录在 luban-lite/packages/artinchip/aic-dm-apps ,首先确保 luban-lite/ 根目录下的 kernel 工程被正确配置且编译通过后,然后生成对应的 dm-app sdk:
$ cd luban-lite/packages/artinchip/aic-dm-apps
$ scons --target=sdk
scons: Reading SConscript files ...
Copy rtconfig.py...
Copy rtua.py...
Copy rt-thread/tools/...
Copy project .h files...
Copy tools/env/...
Copy tools/scripts/...
Copy onestep.sh...
Copy win_env.bat...
Copy win_cmd.bat...
Build local sdk succeed!
dm-app sdk 创建完成以后, aic-dm-apps 就可以脱离 luban-lite sdk 进行开发了。 aic-dm-apps 文件夹可以被拷贝到任意 Linux/Windows 路径进行开发和编译。
也支持清理 sdk:
$ cd luban-lite/packages/artinchip/aic-dm-apps
$ scons --target=c
10.2.1.2.2. 目录结构
aic-dm-apps 的目录结构如下所示:
├── hello                   // hello 实例
│   ├── hello.mo            // 'scons --app=hello' 命令生成的可执行文件
│   ├── hello.so            // 'scons --lib=hello' 命令生成的库文件
│   ├── main.c              // 可执行文件的 main 函数入口
│   ├── rtt_api_test.c      // dm 中调用 rt-thread api 的函数实例
│   └── SConscript
├── LICENSE
├── README.md
├── SConstruct
├── toolchain               // 自动解压后的工具链
├── tools
│   ├── env
│   ├── host
│   ├── onestep.sh
│   ├── scripts
│   ├── sdk                 // 所有的工程头文件
│   ├── toolchain
│   ├── ua.def
│   ├── ua.py
│   └── ua.pyc
├── win_cmd.bat
└── win_env.bat             // 启动 windows 下的命令行
10.2.2. 编译和运行
dm-app 可以被编译成两种类型:可执行文件 (.mo) 和 库文件 (.so)。本质上两者都是 ET_DYN 类型的 ELF 文件,唯一的不同是:可执行文件指定了 main 函数作为执行入口,而库文件指定了 0 作为执行入口。
10.2.2.1. 可执行文件 .mo
10.2.2.1.1. 编译
编译 dm-app 为可执行文件。如果是 windows 双击 win_env.bat 打开命令行运行环境,linux 直接使用 shell 命令行即可。具体步骤如下:
$ cd luban-lite/packages/artinchip/aic-dm-apps
$ scons --app=hello             // 编译
$ ls hello/hello.mo             // 查看目标文件
$ scons --app=hello -c          // 清理
10.2.2.1.2. 运行
把 hello.mo 拷贝到单板存储介质的文件系统中,在 shell 下直接运行:
aic /> /sdcard/hello.mo
[AIC-DM-APP] init!              // DM 初始化函数 module_init()
[AIC-DM-APP] Hello, world!      // DM 主函数 main()
index => 0                      // my_thread_init() 调用 rt-thread API 创建的线程
index => 1
index => 2
index => 3
10.2.2.2. 库文件 .so
10.2.2.2.1. 编译
编译 dm-app 为库文件。具体步骤如下:
$ cd luban-lite/packages/artinchip/aic-dm-apps
$ scons --lib=hello             // 编译
$ ls hello/hello.so             // 查看目标文件
$ scons --lib=hello -c          // 清理
10.2.2.2.2. 运行
在 kernel 中使能 test_dm_lib 测试命令:
Drivers options  --->
    Drivers examples  --->
        [*] Enable DM Lib test command
把 hello.so 拷贝到单板存储介质的文件系统中,并使用 test_dm_lib 命令来动态加载:
aic /> test_dm_lib              // dlopen() 动态加载 /sdcard/hello.so
[AIC-DM-APP] init!              // DM 初始化函数 module_init()
index => 0                      // my_thread_init() 调用 rt-thread API 创建的线程
index => 1
index => 2
10.2.3. 实例代码分析
可执行文件 hello.mo 和 库文件 hello.so 的源码在非常简单基本一看即懂,但是其中有一些特殊的点需要特别说明:
10.2.3.1. 可执行文件 .mo
10.2.3.1.1. rt-thread API 的调用:
rt_thread_create 、 rt_thread_startup 类似的 API 默认已经使用 RTM_EXPORT() 声明,可以直接调用:
#include <rtthread.h>

void my_thread_entry(void* parameter)
{
    int index = 0;

    while (1)
    {
        rt_kprintf("index => %d\n", index ++);
        rt_thread_delay(RT_TICK_PER_SECOND);
    }
}

int my_thread_init(void)
{
    rt_thread_t tid;

    tid = rt_thread_create("tMyTask", my_thread_entry, RT_NULL,
        2048, 20, 20);

    if (tid != RT_NULL)
        rt_thread_startup(tid);

    return 0;
}
10.2.3.1.2. 模块初始化和退出函数:
如果 dm-app 定义了 module_init() 和 module_cleanup() 函数,会在模块初始化和退出时被自动调用:
void module_init(struct rt_dlmodule *module)
{
    printf("[AIC-DM-APP] init!\n");
}

void module_cleanup(struct rt_dlmodule *module)
{
    printf("[AIC-DM-APP] exit!\n");
}
用户可以利用该机制来做一些初始化和清理的工作。如果不需要就不用实现这两个函数。
10.2.3.1.3. 查看 hello.mo 创建的子线程:
从代码可知我们运行 hello.mo 以后,会创建 tMyTask 线程。但是我们使用 ps 或者 list_thread 命令,却无法看到该线程。这是为什么呢?
因为该方式下启动的线程会被链接到模块本身的进程链表 module->object_list ,而上述命令只能查看全局链表 information->object_list 中的线程。
目前模块本身的进程链表 module->object_list 不支持命令查看,在模块退出时会停止掉 module->object_list 中模块启动的所有子进程。
10.2.3.1.4. 后台进程保活:
承接上面话题, hello.mo 的 main() 函数返回后,系统马上会执行模块退出动作,main() 函数创建的所有子进程也会被全部清理。怎么样能让模块的子进程作为后台进程继续运行呢?
我们给 hello.mo 的 main() 函数定义了一个特殊返回值 RT_DLMODULE_DEAMON ,如果返回该值,则 main() 函数返回后系统不会执行模块退出动作:
#define RT_API_TEST

int main(int argc, char *argv[])
{
    printf("[AIC-DM-APP] Hello, world!\n");

#ifdef RT_API_TEST
    my_thread_init();
    return RT_DLMODULE_DEAMON;
#endif

    return 0;
}
10.2.3.2. 库文件 .so
10.2.3.2.1. dlopen()、dlsym() 实例:
test_dm_lib 命令的基本原理是使用 dlopen() 函数动态加载 hello.so 到系统内存,再使用 dlsym() 函数查找到 hello.so 中的 my_thread_init() 函数并调用:
#define DM_LIB_PATH "/sdcard/hello.so"
#define DM_LIB_FUNC "my_thread_init"
#define DEAMON_THREAD

static void cmd_test_dm_lib(int argc, char **argv)
{
    struct rt_dlmodule *module = NULL;
    int (*func)(void) = NULL;

    module = dlopen(DM_LIB_PATH, 0);
    if (!module) {
        printf("dlopen %s fail!\n", DM_LIB_PATH);
        return;
    }

    func = dlsym(module, DM_LIB_FUNC);
    if (!func) {
        printf("dlsym %s fail!\n", DM_LIB_FUNC);
        return;
    }

    func();

#ifndef DEAMON_THREAD
    dlclose(module);
#endif
}
10.2.3.2.2. 查看 hello.so 创建的子线程:
我们通过 test_dm_lib 命令动态加载 hello.so 并调用 my_thread_init() 函数,同样会会创建 tMyTask 线程。但是我们使用 ps 或者 list_thread 命令,这次却可以看到该线程。这是为什么呢?
这是因为系统通过 dlmodule_self() 判断当前进程非模块执行进程,对应的进程链表就加入到了全局链表 information->object_list 中。
10.2.3.2.3. 后台进程保活:
同样的问题,当我们调用 my_thread_init() 函数返回后,常规情况是执行 dlclose(module) 来清理动态加载的模块。如果 my_thread_init() 函数创建的所有子进程希望作为后台进程运行,则不能调用 dlclose(module) 。
这种情况下如果调用 dlclose(module) ,后台进程还能短暂执行,但是一旦有新的内存分配就会覆盖原动态模块的数据,触发 CPU 异常。
10.2.4. gdb 调试
使用 JTAG 调试器连接 SOC,通过 DebugServer 提供的 gdb 调试接口来调试 dm-app。
调试动态模块需要两方面的信息:
动态模块的符号表。
动态模块的动态加载地址。
以 test_dm_lib 命令动态加载 hello.so 为例,描述整个调试过程。
10.2.4.1. 保留 elf 调试信息
hello.mo 和 hello.so 原始 elf 文件中是有 debug 信息的,为了减少动态加载时的内存大小,把这些信息 strip 掉了。
所以在调试的时候,我们需要临时把 rtconfig.py 文件中这个 strip 动作 M_POST_ACTION 注释掉:
# M_POST_ACTION = M_STRIP + ' -R .hash $TARGET\n' + M_SIZE + ' $TARGET \n'
rtconfig.py 文件的路径:如果 aic-dm-apps 还在 luban-lite 目录当中,修改 luban-lite\bsp\artinchip\sys\dxxx\rtconfig.py ;如果 aic-dm-apps 已经从 luban-lite 拷贝出来, 修改 aic-dm-apps\tools\sdk\rtconfig.py 。
重新运行 scons --app=hello 或者 scons --lib=hello ,编译出来的 hello.mo 或者 hello.so elf 文件就是带有 debug 调试信息了。
10.2.4.2. 计算动态加载地址
10.2.4.2.1. 模块动态加载基地址
动态模块的基地址会在加载函数 dlmodule_load() 加载完动态模块后,打印出当前模块的基地址。
aic /> test_dm_lib              // '0x404f8c80' 即模块动态加载的基地址
01-01 10:05:30 I/NO_TAG: Module: load /sdcard/hello.so to 0x404f8c80 succeed.
[AIC-DM-APP] init!
10.2.4.2.2. text 偏移
通过 readelf 命令读取 elf 文件 .text 段的偏移:
$ readelf -S hello/hello.so     // .text 的 Address 字段为 '0x550'
Section Headers:
[Nr] Name              Type             Address           Offset
    Size              EntSize          Flags  Link  Info  Align
    ...
[ 7] .text             PROGBITS         0000000000000550  00000550
    000000000000008e  0000000000000000  AX       0     0     2
    ...
10.2.4.2.3. gdb 加载符号表
通过上两节的地址可以计算出 add-symbol-file hello.so xxx 的基地址:
0x404f8c80 + 0x550 = 0x404F91D0
可以通过 gdb 命令 add-symbol-file aic-dm-apps/hello/hello.so 0x404F91D0 来加载动态模块的符号表了。
10.2.4.2.4. 完整 gdb 调试过程
Step 1:在 gdb 中给系统函数
dlmodule_load()打上断点:
(gdb) b dlmodule_load
Step 2:在串口 shell 中启动
test_dm_lib测试:
aic /> test_dm_lib
Step 3:gdb中断在
dlmodule_load()入口以后,输入finish命令让dlmodule_load()执行完成:
(gdb) finish
Step 4:记录串口 shell 上打印出来的模块动态加载基地址:
aic /> test_dm_lib
01-01 10:05:30 I/NO_TAG: Module: load /sdcard/hello.so to 0x404f8c80 succeed.
[AIC-DM-APP] init!
Step 5:通过
readelf命令读取 elf 文件.text段的偏移:
$ readelf -S hello/hello.so     // .text 的 Address 字段为 '0x550'
Section Headers:
[Nr] Name              Type             Address           Offset
    Size              EntSize          Flags  Link  Info  Align
    ...
[ 7] .text             PROGBITS         0000000000000550  00000550
    000000000000008e  0000000000000000  AX       0     0     2
    ...
Step 6:计算出 .text 的动态基地址:
0x404f8c80 + 0x550 = 0x404F91D0
Step 7:gdb 中加载
hello.so符号表:
(gdb) add-symbol-file aic-dm-apps/hello/hello.so 0x404F91D0
Step 8:操作 gdb 跳转到
hello.so中的my_thread_init()函数后,可以像普通程序一样调试了:
(gdb) n
30      func();
(gdb) s
my_thread_init () at hello/rtt_api_test.c:18
18      tid = rt_thread_create("tMyTask", my_thread_entry, RT_NULL
10.2.5. 创建用户 dm-app
用户开发自己的 dm-app 可以基于 hello 实例来开发,把 hello 文件夹复制并改名成自己的应用:
$ cd luban-lite/packages/artinchip/aic-dm-apps
$ cp -r hello xxxapp
$ scons --app=xxxapp            // 编译
$ ls xxxapp/xxxapp.mo           // 目标文件
$ scons --app=xxxapp -c         // 清理
把用户源文件拷贝到 xxxapp 文件夹,编辑 xxxapp/SConscript 文件让所有源文件能被 scons 编译。 SConscript 的语法和修改方法请参考 Luban-Lite 的相关文档。
10.2.6. 原理说明
在 Linux/Windows 等大型系统中应用和驱动是可以独立开发,应用独立编译成 elf/exe 文件,然后在目标系统上执行。毫无疑问这种动态加载的方式是需要开销的,一般嵌入式系统都精简了该功能。但是在实际产品开发的过程中,特别是需要二次开发的场景,独立开发和编译应用程序有强烈需求。
Luban-Lite 使用动态模块 (Dynamic Module) 机制来支持应用程序独立开发的需求。基本原理如下:
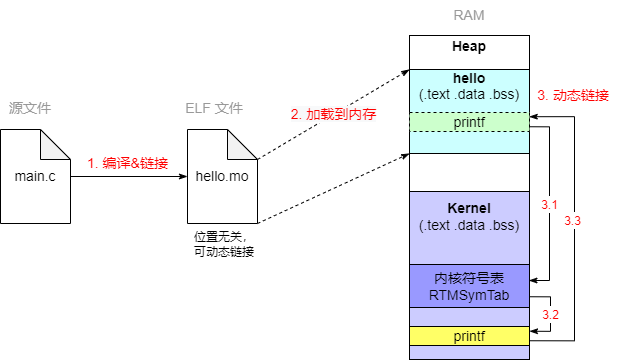
图 10.77 Dynamic Module 实现原理
核心就是实现了 ELF 的链接和加载。具体步骤分解如下:
编译链接:使用
gcc工具链将应用源文件main.c使用-fPIC -shared选项编译链接成ET_DYN格式的 ELF 文件hello.mo。hello.mo是一个标准的ET_DYN格式ELF 文件,位置无关且可动态链接。注意这里需要使用riscv-none-embed-gcc工具链,否则会编译不成功。文件加载:在运行的时候,首先会把
hello.mo文件的数据段代码段拷贝到内存当中。因为我们编译的是位置无关代码 PIC,代码可以被加载到任意位置,所以可以从 Heap 中动态分配内存再进行代码拷贝。此时代码还是不能运行,因为代码中还存在很多对系统函数的调用,需要重新定位重新链接。动态链接:遍历
hello.mo中的可重定位段,对需要重定位的符号,在内核的导出符号表rtmsymtab中查询,将查询到的绝对地址回填到可重定位符号的位置。至此完成动态链接,可以跳转到程序入口处执行了。